Activity: Make a Mummy Case
Make a miniature version of a cartonnage mummy case to discover one of the ways in which the Ancient Egyptians prepared for the journey to the afterlife.
 For Ancient Egyptians, the journey to the afterlife was the most important journey of all, and becoming a well-provisioned mummy could help you get there. Having a good coffin with your picture and name on it could help your spirit identify your mummy when it came time for your spirit to rest and replenish itself, so coffin-making was a very important job. Many people worked to make a single coffin: carpenters, carvers, designers, painters, and scribes.
Learning Goals
- Examine the religious beliefs of other cultures.
- Understand the artwork and visual traditions of other cultures.
- Simulate the process of work and employment in Ancient Egypt.
- Explore different methods of expressing personal meaning in artwork.
Background Information

For the ancient Egyptians, the journey to the afterlife was the most important of all, and making the right preparations was crucial. The Egyptians believed that after a person died, their spirit would live on. Just as in life, a person's spirit could get tired or hungry, and it would need a place to rest and get food from the people who came to visit.
A mummy was an ideal place to rest, and a good coffin would have been in high demand. A coffin shows the deceased as someone who has joined the gods, and now has a face that can see, hear, smell, and taste the way a god does.
Most coffins were made of wood. Though there are many beautiful palm trees in Egypt, their wood isn’t the right kind for making planks. The sycamore fig tree had the best wood for coffins, unless a person could afford imported cedar from Lebanon.
At some times in Egyptian history, people wrapped their dead friends in a layer of cartonnage before putting them in coffins. Cartonnage is a made of strips of cloth or papyrus soaked in gesso or plaster. It’s a bit like the plaster casts that sometimes protect a broken arm or leg; a cartonnage coffin provided an extra layer of protection for a mummy.

Strips of papyrus or linen held together with plaster could be molded around a "dummy mummy" made of mud and straw. When the plaster was almost dry, the dummy would be removed, the real mummy placed inside, and the back carefully sewn shut. Then, the dry plaster could be painted with important information, such as spells from the Book of the Dead, the offering formula (a prayer for the dead person to receive the things they would need in the next world), and, if possible, the name of the person who had died.

The ROM's mummy, Djedmaatesankh, has a beautiful cartonnage coffin. One interesting detail to look for is that, when it was made, this coffin was the latest style, but that meant that the weren't sure how to fit all the images on. For example, they left off one of the magical Seven Hathors - cows who help make sure the dead person will have food in the next life. Another artist had to squeeze a picture of this cow onto an empty space. If you’re visiting in person, try to find the seventh cow. In addition, the names of some of the gods on the coffin have been switched. Styles in coffins changed slowly over the years, but it's usually possible to know how old a coffin is by looking at the decoration and writing. The style of Djedmaatisankh's coffin shows that she died about 2,800 years ago!
As you're working, keep in mind that it's okay to make mistakes! Even if you do, your work might still end up in a museum one day.
Materials
- plasticine
- plaster bandages
- small baking tray
- small container for water
- acrylic paint
- acrylic paint palette
- paintbrushes
- scissors
Preparation
Look up images of cartonnage coffins, and see if you can find some of these common images:
- the owner of the coffin being presented to Osiris
- the weighing of the heart
- the four sons of Horus
Instructions
Step 1
Take a lump of plasticene or modeling clay and work it between your hands until it becomes soft. Mold the lump into a mummy's body shape.
Step 2
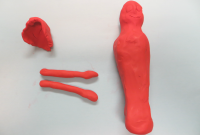
Use more clay to make a headdress and arms for your mummy. Don't worry about details, as these will be covered up later by your mummy case.
Step 3
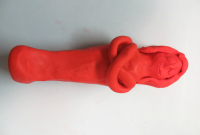
Add the arms and headdress to the body. Smooth them on using your fingers and thumb.
Step 4
Add any details you would like to your "dummy mummy." This dummy is the equivalent of the form made out of mud and straw that the Ancient Egyptians would have used. However, unlike the Ancient Egyptians, you are going to leave your dummy in the case to make it easier to finish, so these details are just for you.
Step 5

Cut the plaster bandages into small strips. This step can be done with strips of burlap and plaster, but if you can find plaster bandages, they are easier and less messy.
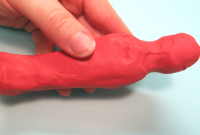
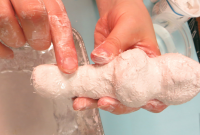
Step 6
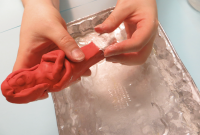
Put a small amount of water in the bottom of a metal baking tray or other container. Dampen the strips one at a time, and use them to wrap your mummy. Smooth the wet plaster with your fingers until it covers all the little holes in the bandage. Cover the whole thing, since we do not need to remove the dummy.
Fun fact: In Ancient Egypt, the dummy would be removed while the plaster was starting to set, the person placed inside, and the back of the case sewn closed.
Step 7
Once the dummy is fully covered in smoothed plaster, set it someplace safe to dry overnight. Let the plaster settle in the tray you used. Then, you can carefully pour the excess water off the top and let the remaining plaster in the tray dry out as well. Once it is dry, it can be broken out and placed in the garbage.
NEVER pour plaster down the sink.
Step 8
Once the plaster has dried, add the first layers of paint to the mummy case. It is a good idea to know what you want to put on your case ahead of time, so you know which layers you need to paint first.
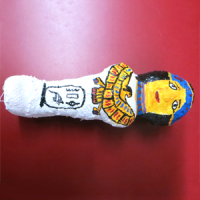
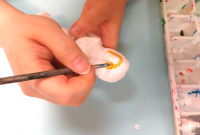
Step 9

After the first layer of paint has dried, add the details overtop. You may wish to use a very small paintbrush for this step. Repeat it as many times as you need to in order to finish all the details.
Tips
- For more even wrapping, start at the feet and work your way up.
- Plaster sets quickly. Be sure to wrap and smooth the bandages as soon as you get them wet.
Follow-Up
- Whose mummy case have you made?
- What details have you put on your mummy case to help the owner's spirit know that it belongs to them?
- What other details did you add to the case?
- Why did you add them?
- What was the easiest part of this activity?
- What was the most challenging part of this activity?
- What aspects of the environment might have contributed to the popularity of cartonnage coffins?
- Imagine what it would have been like to work as a coffin-maker in Ancient Egypt. Write a short diary entry from the point of view of an Ancient Egyptian worker talking about the joys and challenges of a day at work
- Our finished miniature mummy case looks a lot like a shawabti. A shawabti was a magical statuette that Egyptians had buried with them. They believed that the shawabti would act as a servant, or stand-in for them in the afterlife. What chores would your shawabti do for you if you were an Ancient Egyptian?
Teacher Reflection
- Do the student's answers reflect an understanding of the purpose of creating memorials for the afterlife?
- Do the student's answers reflect an understanding of the process of work and the role of workers in Egyptian society?
Extension Activities
 Shawabtis and coffins usually had the deceased's name written on them in hieroglyphs. Give your mummy a name, figure out how the name would be written in hieroglyphs using our hieroglyphs activity, and add it to the mummy case.